


Using videos to announce events, explain complex topics, draw attention to causes and entertain community members is powerful. Until recently, I did not create any videos. Too hard. Requiring complex, expensive equipment. That was my thinking. Until recently a colleague introduced me to OBS Studio – Open Broadcaster Software. With OBS, combining multiple video and audio inputs – layering them on top of each other – is quite simple. And OBS Studio is a free tool. I do not have a camera (apart from the web cam in my laptop and my smartphone). I do not own a green screen. It turned out that using video conferencing software (in my case MS Teams) and a green custom background, I can easily mimic the green-screen effect.
I am in no way a professional video editor, and my results are crude. However, I am quite pleased with the outcome I am now able to produce with very little effort and without any additional equipment. In this article, I want to explain my setup: what are the components I am using and how do they hang together. First, this brief video shows some of the straightforward results available through OBS Studio:
This video consists of three different scenes – three different screen layouts:

In OBS, these scenes can be labeled. Each scene is a composition of one or more sources.

The most complex scene is composed of four layers: one audio (the microphone on the headphones connected to my laptop) and three video: the output from MS Teams with green custom background, the PowerPoint presentation and the background image with the empty room and the desk (also a PowerPoint presentation).

This image show how the output (the final video) is produced by OBS from the four input sources:

More details on the four sources are described below.
My Talking Head – MS Teams with Custom Green Background
See my earlier article create video recording in Microsoft Teams with green screen chromakey background without an actual green screen with step by step instructions for setting up the green custom background in MS Teams

and starting a meeting with myself as the only participant; the output from my webcam is the input for the MS Teams screen on top of the screen background. Instead of creating a recording from the Teams meeting (as described in the article) I will now capture the Teams session in OBS.

The source is added to the list of sources in the scene. In order to remove the green background, I have added a filter of type ChromaKey to the source:

This filter assumes green as the color to get rid off; other colors can be configured as well.
 The source can be moved around in the scene editor. Using the handles the source can be resized and using the handles in conjunction with the ALT key (really valuable) I can also crop the source. This allows we to get rid of the Teams toolbar – a phenomenon that is impossible to hide (when the Teams window is not active) (Google on this topic to read about widespread frustration with this).
Audio – the External Microphone on my Headphone Cord
In order to capture my voice, I have connected a simple headphone cord to my laptop that has a microphone (I use it for my telephone and for all MS Teams meetings).
 I have created a source of type Audio Input Capture and configured it for the External Microphone:

In the Audio Mixer I can set the audio level (amplification factor). This is most useful in case of multiple audio sources that need to me mutually balanced.

Background Image – PowerPoint SlideShow
The backdrop in this case – the room, the desk, the wall decoration and the screen hanging from the ceiling – is taken from a PowerPoint SlideShow. This makes it easy to change backgrounds by just going to the next slide. Using an image (file) as background works just as well. Note: OSB does not really have the notion of a background; input sources are layered on top of each other. The layer that is lowest on the stack is the background against which the higher layers are positioned.

OSB cannot correctly capture a PowerPoint slideshow presented in full screen mode. It is necessary to change the PowerPoint SlideShow SetUp and switch to Browsed by an individual (window):

Start the SlideShow. Now, OBS can capture this slideshow as a source:

Use the handles on the source and the ALT key to crop the source.
Floating Slideshow
The floating screen in the background image is the base layer on top of which I positioned a PowerPoint slideshow that provides the actual slides. This slideshow too is setup in Browsed by an individual (window) mode.

I start the slideshow in PowerPoint and whenever I change the slide in the show, the input to OBS is updated and the output from OBS is updated.
Extra Input Sources
OSB does not really have a (practical) limit on the number of input sources. I can add text to display – even scrolling across the display – colourful areas, browser content, media sources such as video clips etc.

I can also add an additional camera input for more perspective. You may think: but I do not have a camera! Then I would counter: you have your phone, that can act as that additional camera. And you engage that camera in several ways:
- with freeware tool e2eSoftiVCam (an app and a desktop application) you can turn your iPhone into an extra camera device for OBS

- participating with your phone’s camera on in a video conference session that your laptop also participates in – for example: start a meeting in MS Teams (or other video conferencing tools). Join that meeting on your laptop (with OBS running) and on your phone, with camera turned on. Note: you may need to join this meeting in a browser rather than in the desktop client if you are using the latter for the “green screen talking head capture”. OBS can use Window Capture or Browser [Capture] to capture the feed from the mobile phone’s camera in the Teams meeting in the browser. Use crop to get the essence from this feed.


Additional Scenes
OBS allows definition of multiple scenes. A scene is a layout, a composition of input sources. By predefining multiple scenes, it becomes possible to provide viewers with a little variety. Different perspectives and subsets of sources can be shown, with sources being relocated, resized or even hidden as well as by using filters to manipulate the output from sources.

Before recording or streaming, I set up the scenes I want to be able transition to. I use labels to describe the scenes – and perhaps to specify their intention.

And in order to make smooth transitions possible during my recording session, I also assign
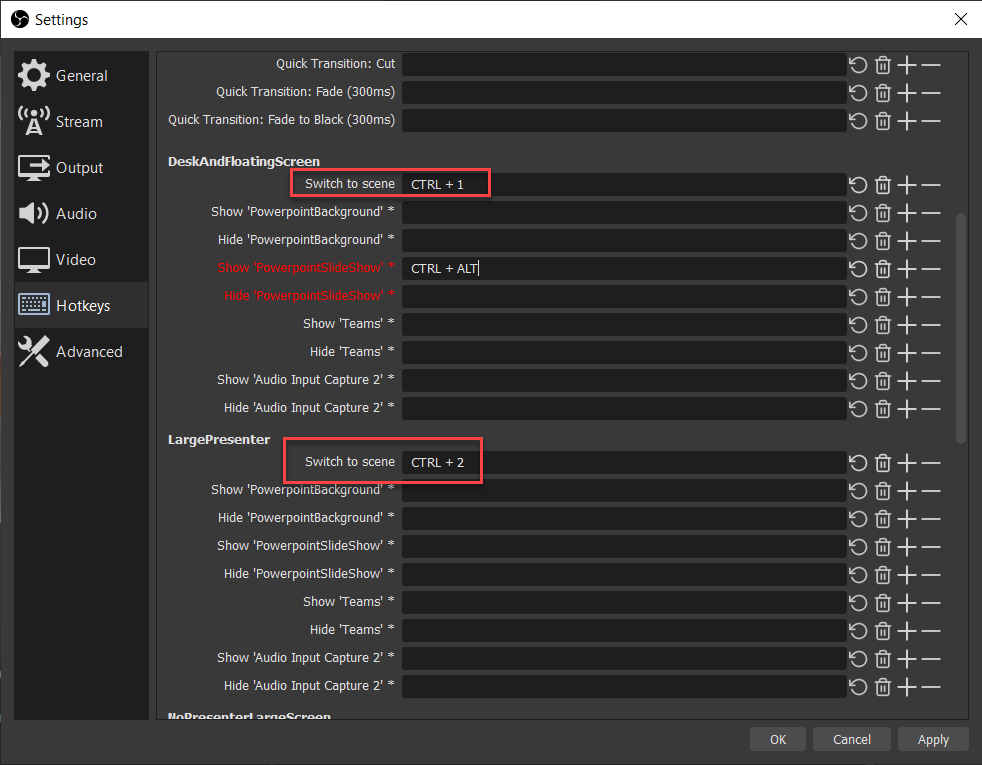
Short Cut Keys for Scene Transitions
In order to easily transition between scenes, I can define short cut keys. Each scene can have its own short cut key – to switch to scene and also to show and hide (same shortcut key) a source in a scene. Click on Settings, then select Hotkeys. Note: after switching to a scene, I also need to explicitly transition (using CTRL+T or whatever hotkey I assign to this action).

Recording and Finishing Touch
OBS is used frequently for Streaming (to a live stream). You can stream to an event that no one knows about and record the stream, as a way to create a video. Alternatively, you can also use OBS to record the output to a file. This file can be used as input source in a subsequent Streaming event – or it can be used as input for another recording.
Use these shortcuts for recording: CTRL+R to start (and stop) recording, CTRL+Space to pause (and unpause) recording.
OBS records to the .MKV format. Many video players support this format. However, it is easy enough to convert from MKV to MP4. Use the File | Remux Recordings option. Select the .mkv file to remux and press the Remux button. An MP4 file is created; this is a fairly rapid process.

It is not uncommon for the MP4 files to contain too much information (the first few seconds of the recording are not great as you were not ready when the director called action! or you pressed stop recording just a little too late. There are many video editing tools. I have not tried many of them and my experiences are mixed. The larger the tool, the more problematic it seems the editing becomes. Short files are manipulated pretty easily, for example using video editing capabilities in PowerPoint, with SnagIt, using VLC Mediaplayer and with the freeware and lightweight tool MP4Tools.
Once the MP4 file is ready, you can upload it to YouTube or another video service – or of course share it in a more private manner. MP4 files (as well as MKV) can also easily be embedded in PowerPoint presentations. These presentations can be used as an input source in OBS and thus become part of a yet a new streaming session or recording. (In The Netherlands we call this the “Droste-effect”.
Resources
MP4 Tools – joiner(merge MP4 files) and splitter – https://www.mp4joiner.org/en/ (freeware,light weight)
OBS – Open Broadcaster Software – https://obsproject.com/
My earlier article on the green screen custom background in Microsoft Teams: Create video recording in Microsoft Teams with green screen chromakey background without an actual green screen
echt vet! thanks!