

Terraform is used for automated provisioning of resource on Oracle Cloud Infrastructure. Resources are defined in HCL – the DSL used in Terraform for describing infrastructure – and these definitions are processed by the OCI provider for Terraform that turns the definitions into the required calls to the OCI REST APIs.
There are several ways to run OCI resource management based on Terraform definitions. This article sums them up and briefly demonstrates creation and subsequent application of a Stack using OCI CLI.

To create OCI Resources from Terraform definitions:
- run standalone Terraform (anywhere, self installed) – with OCI Provider installed and with local OCI configuration and authentication – read my article
- note that one of the OCI resources we can create using Terraform is a Stack that itself is based on a Terraform configuration and can be used to provision OCI resources
- run Terraform from OCI CloudShell – which already contains Terraform and can run with Instance Principal Authorization (no private key required) – read my article
- similar as in the previous bullet: using Terraform we can create a Stack – based on a Terraform configuration (and yes, that Stack could define yet another Stack and so on)
- create a Stack in OCI based on a Terraform configuration and – after providing values for variables – apply the stack; Terraform runs a fully managed VM (with Terraform, OCI Provider and authorization taken care of); the Stack can be created in several ways:
- through the console – based on an uploaded Zip-file, a reference to a source code repository (OCI DevOps Code Repo, GitHub, BitBucket, GitLab, …), a private template, an existing compartment (and the resources it contains) – read my article
- through OCI CLI – running locally or in Cloud Shell – using a local zip file or a reference to source code repository
- from Oracle DevOps Build Pipeline – the OCI DevOps Build Server is a VM that comes with OCI CLI pre-installed (though not Terraform)
- (in the near future- not supported at the time of writing – December 2022) run an OCI DevOps Deployment Pipeline that in turn runs a Resource Manager job that applies a Stack
In previous articles, I have shown the first three options on this list, See the references. In the remainder of this article, I will quickly create a Stack from a Terraform configuration using OCI CLI and then apply that stack. This approach can be used anywhere OCI CLI runs – including OCI Console Cloud Shell and OCI DevOps Build Pipeline.
Create and Apply Stack through OCI CLI
First I clone a Git repository that contains the Terraform configuration I want to use to base the Stack on. And I create a zip file that contains the files that constitute the Terraform configuration. In this case, the Git repo is on this GitHub URL. The Terraform configuration is located in the directory stackBucketAndObject. The code below clones the repository, creates a zip file bucket-and-object-stack.zip with the contents in this directory and removes the cloned repository.
cd /tmp
git clone https://github.com/lucasjellema/oci-terraform-composites
cd ./oci-terraform-composites/stackBucketAndObject
zip -r bucket-and-object-stack.zip .
mv bucket-and-object-stack.zip ../..
rm -Rf oci-terraform-composites
cd ../..

With the zip file for the stack it is time to enlist the OCI CLI with two commands to create the stack and create an apply job for that stack:
export config_source_zip=./bucket-and-object-stack.zip
export compartment_id=ocid1.compartment.oc1..aaaaaaaa5q2srleka3ll2xgpcdj3uns3nshzc3lbn2wgx2kcuah5blh47icq
export stack_display_name=object-storage-bucket-stack
STACK_ID=$(oci resource-manager stack create –compartment-id $compartment_id –display-name=$stack_display_name –description “Created through OCI CLI” –config-source $config_source_zip | jq -r ‘.data.id’)
oci resource-manager job create-apply-job –execution-plan-strategy AUTO_APPROVED –stack-id $STACK_ID –display-name “Running Apply Job from OCI CLI”
The execution of these commands look like this (in Command Shell):

Everything seems successful. However, the job turns out to have failed. When the stack is created in this way, apparently the same default values are not applied to tenancy_ocid and compartment_ocid as when the stack is created through the console.
 Therefore when the stack is created, (default) values need to be provided for these variables. When the apply job is created, we can also provide variables – to override the values defined for the stack.
The second attempt looks like this
export config_source_zip=./bucket-and-object-stack.zip
export compartment_id=ocid1.compartment.oc1..aaaaaaaa5q2srleka3ll2xgpcdj3uns3nshzc3lbn2wgx2kcuah5blh47icq
export tenancy_ocid=ocid1.tenancy.oc1..aaaaaaaag7c7slwmlvsodyym662ixlsonnihko2igwpjwwe2egmlf3gg6okq
export stack_display_name=object-storage-bucket-stack
export region=”us-ashburn-1″
export variables=(‘{“compartment_ocid”: “‘${compartment_id}'”, “tenancy_ocid”: “‘${tenancy_ocid}'” , “region”: “‘${region}'” }’)
STACK_ID=$(oci resource-manager stack create –compartment-id $compartment_id –display-name=$stack_display_name –description “Created through OCI CLI” –config-source $config_source_zip –variables “${variables}” | jq -r ‘.data.id’)
oci resource-manager job create-apply-job –execution-plan-strategy AUTO_APPROVED –stack-id $STACK_ID –display-name “Running Apply Job from OCI CLI”

And this time the stack is created and the job is executed successfully

The job outcome:

The Bucket and the Object are created:

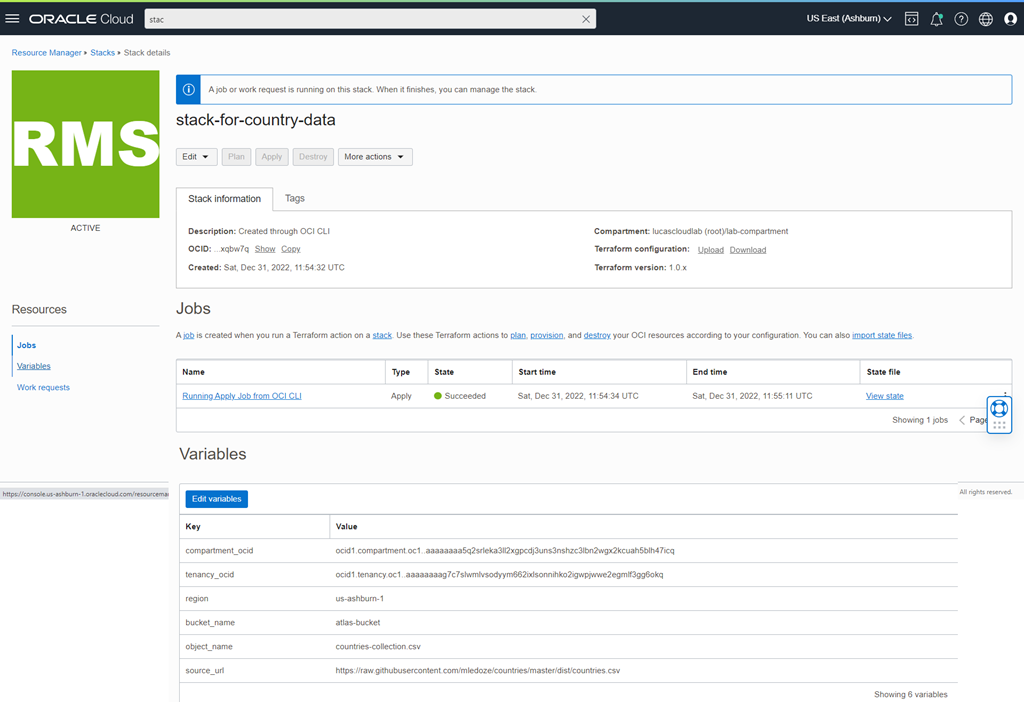
Let’s create and apply a second stack for a different bucket and object:
export bucket_name=”atlas-bucket”
export object_name=”countries-collection.csv”
export source_url=”https://raw.githubusercontent.com/mledoze/countries/master/dist/countries.csv”
export variables=(‘{“compartment_ocid”: “‘${compartment_id}'”, “tenancy_ocid”: “‘${tenancy_ocid}'” , “region”: “‘${region}'”, “bucket_name”:”‘${bucket_name}'”, “object_name”:”‘${object_name}'”, “source_url”:”‘${source_url}'” }’)
STACK_ID=$(oci resource-manager stack create –compartment-id $compartment_id –display-name=$stack_display_name –description “Created through OCI CLI” –config-source $config_source_zip –variables “${variables}” | jq -r ‘.data.id’)
oci resource-manager job create-apply-job –execution-plan-strategy AUTO_APPROVED –stack-id $STACK_ID –display-name “Running Apply Job from OCI CLI”

And the corresponding Bucket and Object are created.

And deeplinking to the Bucket:

Resources
run standalone Terraform (anywhere, self installed) – with OCI Provider
installed and with local OCI configuration and authentication – read my article
run Terraform from OCI CloudShell – which already contains Terraform
and can run with Instance Principal Authorization (no private key
required) – read my article
create a Stack in OCI based on a Terraform configuration and – after
providing values for variables – apply the stack – through the console – based on an uploaded Zip-file –
read my article
OCI Documentation CLI Reference Create Stack – https://docs.oracle.com/en-us/iaas/tools/oci-cli/3.22.0/oci_cli_docs/cmdref/resource-manager/stack/create.html
my GitHub Repo with OCI Terraform definitions – https://github.com/lucasjellema/oci-terraform-composites