

Terraform is the tool of choice for automated provisioning of cloud resources on Oracle Cloud Infrastructure (IaC). In two recent articles, I have demonstrated how to create a plan with resource definitions to be processed by the OCI provider for Terraform and how to (re)use a Terraform Module to allow multiple resource to be created as per the dynamically defined parameter. Both articles showed Terraform being used in the context of Cloud Shell – manually starting the automated provisioning process.
In this article, I will zoom in on another aspect of using Terraform to provision OCI resources: use of a Stack. A Stack is a collection of resources that you can create, update, and delete as a single unit through OCI Resource Manager. At the heart of a Stack is a Terraform configuration – a collection of Terraform resource definitions that describe what the Stack’s execution should bring about in actual cloud resources. When you update a stack, Resource Manager compares the current state of the stack with the desired state specified in the updated template, and makes any necessary changes to the stack to bring it into compliance with the updated template.

When you delete a stack, Resource Manager deletes all of the resources in the stack. It feels a little as if the Stack is a Digital Twin for the “real world” – where of course that real world is also a digital one – composed of software defined cloud resources. A Stack is fully managed “inside” OCI – somewhere undoubtedly there is a VM that runs Terraform, applying the resource definitions in the Stack’s configuration. But that is hidden from view : we do not have to install and configure Terraform.
You can use Resource Manager to deploy stacks in different regions and compartments within your tenancy, and you can use the same template to deploy multiple stacks.
In this article I will create a Terraform configuration to base the Stack on. This configuration is derived from what I created in the previous articles. The Stack is then created through the console. I will then set variable values and have the stack “executed” (applied). Next, I will update some of the input variables – which in turn will have an effect on actual OCI resources.
Terraform Configuration – .tf files in a zip
I have created a zip-file. It contains the Terraform definition files for a Bucket and (through a module) an Object in the Bucket (with the Object’s content downloaded from a URL). It is largely the same set of files discussed in the earlier articles. These files are available on GitHub.

Note: if the configuration defines variables with exactly these names: tenancy_ocid, compartment_ocid, region, current_user_ocid – then these variables will be set to the proper values when the stack is “executed”.
Create Stack
Creating the Stack is easily done in the console. From the main OCI Console’s menu, pick Developer Services | Resource Manager | Stacks.

Click on the button Create Stack:

Next, the main Stack Configuration page is shown. Select the origin for the stack. This can be source code control system, an Object Storage Bucket, an existing compartment’s set of resource, a (reusable, predefined) template and an uploaded zip-file that contains a Terraform configuration. In this case, I use that latter option.
I also provide a name and a brief description for this stack. It is to be a stack for a Bucket and a single Object. The Object will be a CSV file with Country Records.

Press Next.
Set variable values for Stack
The Stack defines a number of variables (all in file variables.tf in this case). Some are prepopulated with contextual values (tenancy_ocid, compartment_ocid) or defaults (bucket_name, content_type, object_name). All can be overridden.
I set bucket_name to countries-bucket, object_name to countries_collection.csv and source_url to https://raw.githubusercontent.com/datasets/country-codes/master/data/country-codes.csv (a suggestion from ChatGPT after first giving a on existent suggestion and two suggested files that did not have the described content).

Press Next.
An overview page shows the Stack definition as it currently stands.

I accept these values by clicking on Create.
The Stack is created – but not yet “applied” or “executed”. The digital twin exists, but its real brother is yet to be created.

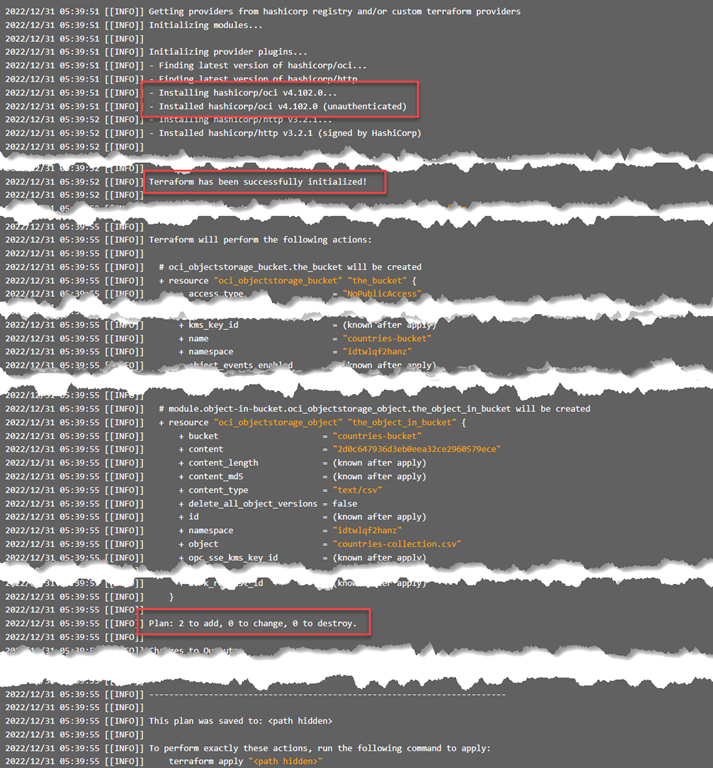
Try Out – Plan the Stack
Click on Plan is very similar to executing “terraform plan” on the Terraform configuration in the stack combined with the values provided for the variables in the Stack definition.
After some time (more than 60 seconds in this case) the Plan Job is complete and successful:

The output is the same output we would have seen on the command line if we executed “terraform plan”.
Stack Execution – Apply
I am satisfied with the outcome of the Plan stage. I feel confident I can apply the Stack – and bring the “other twin” into being. 
I press the Apply button. The dialog shown on the right appears. I can either select the outcome of the Plan action as the state to compare the outcome of the Apply with and base approval on – or allow automatic approval of the Apply result regardless.

Press Apply to put the wheel in motion.
At this point, the Terraform actions are moved to an internal, fully managed VM and executed there in the background (just like the previous Plan Job)

After a little while, the job is complete.

In this case, it is successful. The logs from all Terraform activity are available. Additionally, the Resources that have been managed can be listed, the Outputs (defined in the Terraform configuration) are available and the (current) State recorded by Terraform can be checked.

As expected, the Bucket has been created and it contains the Object it was configured to contain:

Let’s for the fun of it remove the object from bucket – and add a different object.
 And let’s re-apply the Stack. I would expect it to attempt to restore the order by recreating the state defined in the stack. That would mean creating the CSV file with country data and removing this manually created resource.

It turns out it does create CSV file but leaves the manually created file untouched. That manually created resource does not (even) show up in the drift detection report. I am a little surprised about this – especially because running the same Terraform configuration myself in Cloud Shell did cause the manually created object to be removed.

Update Stack Variables
One way of altering the definition of the Stack is by changing the values of the variables associated with the Stack. In this case I have changed the value of object_name:

Press Next, then press Save Changes

Then with the changed variable value, Apply the Stack:

The change in the variable value is picked up and applied:
And the Bucket details page shows the updated Object’s name:


Edit Stack Configuration in Cloud Code Editor
A fairly recent addition to the Stack functionality is the option in the Console to open the Stack’s Terraform Configuration in the Cloud Code Editor, as shown here:

The Code Editor is opened in the browser and presents the Terraform files that were uploaded in a zip-file. These files can be edited and the changes are saved to the Stack definition. However, when the Stack is next applied, the changes do not seem to take effect. I am currently not sure what good it is to edit the configuration.

I have made a small change; add the proper freeform-tags to the bucket resource.

Close the Editor. Re-apply the Stack. Check the Bucket. No changes visible in the Bucket definition nor in the output from the Job (of Applying the Stack).
Button (or Link) to Deploy to Oracle Cloud
In some GitHub repositories (for example this one) and OCI tutorials, I have come across this button:

I did not quite completely understand what it is for and what it does.
Upon closer inspection, the button is just a link (an <a> element with an <img> nested inside). The essence of the button is the URL associated with the link. And that link leads right into the Resource Manager in OCI Console (https://cloud.oracle.com/resourcemanager/stacks/create) – and is capable of interpreting a query parameter called zipUrl. When that parameter contains the URL of a zip archive that contains a Terraform configuration, then following that link – for example by pressing the button – is all it takes to land on the OCI Console Resource Manager page for creating a Stack based on the Zip file.
I have stored the sources for this article on GitHub and included among them a zip-file that just contains all sources. The full GitHub address for that zip-file is https://github.com/lucasjellema/oci-terraform-composites/blob/main/stackBucketAndObject/archives/stack-bucket-object.zip?raw=true
So I expect this following link to take you to the OCI Console, Resource Manager, Create New Stack from my Terraform Configuration – and this means you are but a few click away from getting a nice bucket created in your own OCI Tenancy and Compartment.
Click this Link to Create a Stack in OCI from the Terraform Configuration Discussed in this article
When you click the link, you will have to login to your OCI account before ending up here:

And from here you can rapidly create the Stack definition, provide variable values and proceed to optionally apply.
Resources
Source for this article are available on GitHub.
OCI Docs – Update variables in a stack – https://docs.oracle.com/en-us/iaas/Content/ResourceManager/Tasks/update-stack-vars.htm
GitHub – oracle-quickstart/oci-cis-landingzone-quickstart: Quickstart Terraform configuration for tenancy setup according to CIS OCI Foundations Benchmark. – https://github.com/oracle-quickstart/oci-cis-landingzone-quickstart
Terraform Resource time-sleep – Terraform Documentation and sample article https://pet2cattle.com/2021/06/time-sleep-between-resources
Use Terraform in the Oracle Cloud with Stacks (blog article, Arne Brüning, 2019) – https://arnes-stuff.blogspot.com/2019/03/use-terraform-in-oracle-cloud-with.html
How to create a Deploy to Oracle Cloud button – OCI Docs – https://docs.oracle.com/en-us/iaas/Content/ResourceManager/Tasks/deploybutton.htm